When we first looked at buying an Airstream, we were offered a small discount on a new trailer with a basketball sized dent in the rear drivers-side end cap panels. The dealer had backed into a tree branch when parking at the RV show at their fairgrounds. Not knowing the work involved with end cap replacements we wisely passed on that opportunity. Whew! Good decision for us.
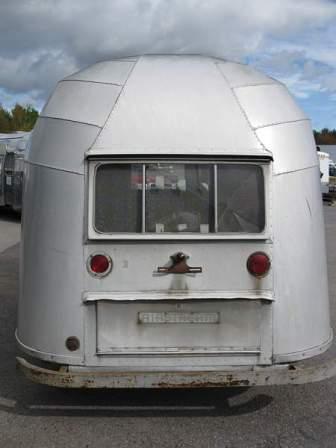
Two years later, we decided that our ideal vintage Airstream trailer was a 22 foot 1955 Flying Cloud. One year after that we found our vintage Flying Cloud...perfect with a twin bed layout...and a basketball sized dent in the rear drivers-side end cap panel. Guess that we were meant to buy a dented Airstream.
Now that has all changed. Colin tried to remove the dent but the aluminum was stretched and could not be reformed. As we were doing a full restoration with the interior skins removed, it was decided to replace the panels...One of those one time events in our lives, so "do it right" things.
With beads rolled at the bottom of our two new end panels, the panels were fitted with clecos before being buck riveted into place.
The final window frame was also buck riveted to the shell and end cap seam.
Airstream Restoration of Scott and Kathy's 1955 Flying Cloud Whale Tail - Our California Vintage Airstream.
Showing posts with label Exterior. Show all posts
Monday, March 30, 2015
Sunday, March 29, 2015
Colin's New Hobby - Beading
Colin added new equipment to his shop and just in time! 1955 Airstreams, actually "all" of the Airstreams until approximately 1959 were made with 13 panel end caps. These thirteen end cap panels each has a rolled edge at the bottom of the aluminum which is made with a set of bead rollers.
Our 2008 CCD Airstream does not have this feature. Don't run your fingers over these sharper seams!
Thursday, March 26, 2015
Beautiful Back End!
The new rear hatch door with a new 1950's reproduction Airstream name plate from Vintage Trailer Supply is installed. I'm so glad for the custom hinges that Colin built for us. More holes were cut into the shell, these are for the housings to hold the tail lights.
Labels:
Exterior,
Lighting,
Vintage Airstream,
Vintage Trailer Supply
Thursday, May 22, 2014
Heating Up!
While we want hot water and the water heater needs an exterior exhaust and access, I would not want to cut a hole into the shell aluminum. Fortunately this scary job is now done. So excited to be moving forward again!
Sunday, March 16, 2014
Protecting Jalousie Window
Our only jalousie window is at the front of the 1955 Flying Cloud. Many other trailers have jalousie windows on the sides of their vintage trailers, but the original owners (who are you?) chose to have the window with glass louvers at the dining area.
Great idea but, what about the potential for crashing flying rocks? Even tiny chips of gravel or sand flying at 60 mph could break glass. We enjoy fly fishing, and many of the best "hidden" spots are along winding rivers on narrow gravel roads. To drive to quiet spots and/or boondock, we again will need the smaller less maintained roads which are not paved in concrete and cement or asphalt. So Colin's guys made us a custom built stone guard for our front window. Made of wavy green fiberglass, and yes Colin did say fiberglass! We will have light and save our windows too!
Shown propped open while our stone guard awaits the opening arms and tie down clips.
Looking at the details!
Location:
Peru, NY 12972, USA
Saturday, March 15, 2014
First Look - New Bumper Trunk Lid - Keeping Water Out!!!
Just a quick sneak peak at our new bumper trunk. This is not original to our trailer, so Colin's guys fabricated the aluminum lid.
Key to keeping the plywood floor from rotting is to keep it dry. Our 1955 Flying Cloud has the sloping rear end which helps move water away from the trailer. Colin added the aluminum flashing between the exterior shell and the C-Channel. This small but huge addition acts like flashing in other applications, moving rain water away from the entry point.
We will definitely use the extra outdoor storage, and I really appreciate the extra protection at the rear of the trailer.
Labels:
Aluminum,
Bumper,
Bumper Trunk,
Colin Hyde Trailer Restorations,
Exterior,
Improvement,
Rot,
Water Damage
Location:
Peru, NY 12972, USA
Sunday, March 9, 2014
Longing for More Awning Memories
There is something special about sitting outside under an Airstream awning.
Maybe it is the friends that stop by to visit, sitting back in our comfy folding chairs and making plans for the day. In the morning, I know I can sit outside under my awning enjoying gentle sunrises and the smell of bacon cooking over a camp stove. Or during the mid-day heat, we can sit and breathe - and not be rushing around in the frenzy that is normal daily life. Maybe the special feeling comes from a cooling breeze. And at the darkest part of our evenings, I love to hear the guffaws and tinkling laughs of some of my favorite people.
And I am thinking about all these times now.
Our now-polished awning rail for our vintage Airstream awning rail is re- installed.
The aluminum was buffed after the awning rail was removed.
Cleco fasteners hold the polished awning rail in place.
Location:
Peru, NY 12972, USA
Saturday, March 8, 2014
Making Our 1955 Flying Cloud Beautiful - More Trim for the Shell
After the Alclad shell is secured to the frame, the aluminum wrapping over the belly pan still looka a bit unfinished.
To cover the seam, front lower trim is installed. Banana Wrap!
Location:
Peru, NY 12972, USA
Friday, March 7, 2014
Windows - We've Got Windows! - Part 4 - Little Eyebrows the Drip Edges
When listening to Colin and Tim talk, I heard that lots of rivets are used.
I read about lots and lots of rivets in Tim's book on Airstream Restoration called Restoring a Dream.
Now I am understanding.
Rivets on the back-widow. Rivets on the front window. Rivets on the Drip Edge. And that is just a window!!!
Polished to shine.
The aluminum drip edges over the windows are positioned with clecos. Thanks Reid!
Location:
Peru, NY 12972, USA
Wednesday, March 5, 2014
Hatch Door - Framed!
The original hatch frame was cleaned, straightened, and polished.
For superior strength, the rear hatch frame was buck riveted.
Our hatch has new gaskets. Polished to shine, the original hatch drip edge was straightened and fit with clecos to be riveted.
Location:
Peru, NY 12972, USA
Tuesday, March 4, 2014
Hatch - Door to the Man Cave
Every man needs a spot of his very own. A man cave of sorts. In an Airstream that space may be limited to the area accessed by the hatch. Actually I am kidding, but Scott does use the exterior compartment more often than I do...
Corrosion required a new rear hatch.
Like the curbside window, the rear hatch also required a new hinge. Colin Hyde to the rescue! He made a new hinge. This is the new lower hinge before it is trimmed to fit the hatch door.
Colin's guys made us all new hatch door with a new Alclad aluminum skin.
Location:
Peru, NY 12972, USA
Monday, March 3, 2014
Whale Tail Removed - Too Much - Creased, Stretched and Dented
We tried to save the original end cap panels. Really tried.
The big dent is too big. Too deep. Too creased.

Permanently creased, the dented aluminum panels of the street-side end cap are again removed for replacement patterns.
Okay, here's the thing. I am not the handy one in the family. So as well as learning lots - my job is to document the process. So if anyone has any suggestions for how to improve this vintage Airstream blog, please do share with me using the comments feature below. Seriously, I'd like to think that I am not the only one reading this....
Location:
Peru, NY 12972, USA
Sunday, March 2, 2014
Windows - We've Got Windows! - Part 3 - Unobtanium No Longer!
Unobtantinum - No longer! *
First the lower "back-window" is fit into the window opening.
Curbside, the rebuilt fixed window with the original frame is positioned with cleco fasteners.
* Colin the miracle worker - he found a way to build a new window hinge to replace the missing one!
The street-side original window was not missing but the hinge was destroyed.
The curbside windows cleco'd and with protective tape is ready for vulkem and then buck riveting.
First the lower "back-window" is fit into the window opening.
The original vintage Airstream window frames which were restored with new glass, are fitted into the street side.
Curbside, the rebuilt fixed window with the original frame is positioned with cleco fasteners.
* Colin the miracle worker - he found a way to build a new window hinge to replace the missing one!
The street-side original window was not missing but the hinge was destroyed.
The curbside windows cleco'd and with protective tape is ready for vulkem and then buck riveting.
The curbside window and awning back-window is riveted to our 1955 Flying Cloud.
Location:
Peru, NY 12972, USA
Thursday, February 27, 2014
Door-in-a-Door Rebuild - Part 3
Boss! Da Door! Da Door!
I don't know why I'm in a mood to think about the old TV show "Fantasy Island", as I never watched it.
Work is done on the Door-in-a-Door!
The inner door rivets were removed to separate the back and frame from the damaged front aluminum.
+Exterior+Shell+Removed+from+the+Frame.jpg)
Prodex insulation is added to each section in the frame.
Using new aluminum, the new outer door is cut and formed.
The two doors are attached together with the hinges. Then the door hinges are securely attached to the new thick hinge patch also made from aluminum.
LINK to 2/13
Labels:
Aluminum,
Cleco,
Door-In-A-Door,
Exterior,
Hinge
Location:
Peru, NY 12972, USA
Monday, February 24, 2014
Raised Eybrow! - Drip Edge for the Door
Back in the 1955 Airstream trailers had people-like personalities. The straightend and polished door's eyebrow gutter was installed.
Labels:
1955,
Cleco,
Door-In-A-Door,
Exterior
Location:
Peru, NY 12972, USA
Subscribe to:
Posts (Atom)
.jpg)
.jpg)
.jpg)
.jpg)
.jpg)
.jpg)
.jpg)
.jpg)
.jpg)

.jpeg)
%2BCutting%2Bhole%2Bfor%2Bhot%2Bwater%2Bheater.jpg)
+Custom+Built+Stone+Guard+1.jpeg)
+Custom+Built+Stone+Guard+Open+However+Still+Requires+Arms+and+Tie+Down+Clips+2.jpeg)
+Custom+Built+Stone+Guard+Open+However+Still+Requires+Arms+and+Tie+Down+Clips+1.jpeg)
++Custom+Built+Stone+Guard+Details.jpeg)
+Fabrication+of+bumper+trunk+lid.jpg)
+Buffing+Aluminum+After+the+Awning+Rail+was+Removed.jpg)
+Awning+Rail+Cleco+Positioned.jpg)
+Awning+Rail+Ready+to+Rivet.jpg)
+Front+Lower+Trim+Installation.jpg)
+Front+Banana+Wrap+Lower+Trim+Installed.jpg)
+Polishing+Drip+Edges+for+over+Windows.jpg)
+Polished+Drip+Edges+Cleco+Positioned.jpg)

+Polished+Drip+Edges+Ready+to+Rivet.jpg)
+Reconditioned+Hatch+Frame.jpg)
+Buck+Riveting+Hatch+Frame.jpg)
+Hatch+Frame+Bucked+with+New+Gasket.jpg)
+Hatch+Door+Driip+Edge+Straightened+Polished+&+Cleco'd.jpg)
+Original+Bashed+Hatch.jpg)
+Original+Hatch+Door+and+New+Untrimmed+Lower+Hinge.jpg)
+Fabrication+of+New+Hatch+Door.jpg)
+New+Hatch+Door+with+New+Alclad+Skin.jpg)
+New+Hatch+Door+Alclad+Skin+Cleco'd.jpg)

+Preliminary+Fit+Street+Side+Awning+Window+Back+Frame.jpg)
+Preliminary+Fit+Streetside+Upper+Window.jpg)
+Preliminary+Fit+Rebuilt+Curbside+Window.jpg)
+Fabrication+of+New+Lower+Hinge+for+Streetside+Front+Window.jpg)
+Curbside+Windows+Cleco'd&+Masked+to+be+Vulkemed+&+Bucked.jpg)


+Insulating+Door+in+a+Door.jpg)
+Exterior+Aluminum+to+Rivet+to+Frame.jpg)
+Attaching+Door+to+Airstream.jpg)
