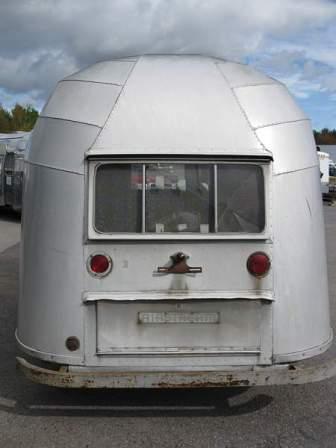
Airstream Restoration of Scott and Kathy's 1955 Flying Cloud Whale Tail - Our California Vintage Airstream.
Showing posts with label Aluminum. Show all posts

Monday, March 30, 2015

End Cap Panels - Dent Be Gone!

When we first looked at buying an Airstream, we were offered a small discount on a new trailer with a basketball sized dent in the rear drivers-side end cap panels.  The dealer had backed into a tree branch when parking at the RV show at their fairgrounds.   Not knowing the work involved with end cap replacements we wisely passed on that opportunity.  Whew!  Good decision for us.

Two years later, we decided that our ideal vintage Airstream trailer was a 22 foot 1955 Flying Cloud.  One year after that we found our vintage Flying Cloud...perfect with a twin bed layout...and a basketball sized dent in the rear drivers-side end cap panel.  Guess that we were meant to buy a dented Airstream.

Now that has all changed.  Colin tried to remove the dent but the aluminum was stretched and could not be reformed.  As we were doing a full restoration with the interior skins removed, it was decided to replace the panels...One of those one time events in our lives, so "do it right" things.

With beads rolled at the bottom of our two new end panels, the panels were fitted with clecos before being buck riveted into place.


The final window frame was also buck riveted to the shell and end cap seam.

Sunday, March 29, 2015

Colin's New Hobby - Beading

Colin added new equipment to his shop and just in time!  1955 Airstreams, actually "all" of the Airstreams until approximately 1959 were made with 13 panel end caps.  These thirteen end cap panels each has a rolled edge at the bottom of the aluminum which is made with a set of bead rollers.

Our 2008 CCD Airstream does not have this feature.  Don't run your fingers over these sharper seams!

Saturday, March 15, 2014

First Look - New Bumper Trunk Lid - Keeping Water Out!!!

Just a quick sneak peak at our new bumper trunk.  This is not original to our trailer, so Colin's guys fabricated the aluminum lid.
Key to keeping the plywood floor from rotting is to keep it dry.  Our 1955 Flying Cloud has the sloping rear end which helps move water away from the trailer.  Colin added the aluminum flashing between the exterior shell and the C-Channel.  This small but huge addition acts like flashing in other applications, moving rain water away from the entry point.
We will definitely use the extra outdoor storage, and I really appreciate the extra protection at the rear of the trailer.

Saturday, March 8, 2014

Making Our 1955 Flying Cloud Beautiful - More Trim for the Shell

After the Alclad shell is secured to the frame, the aluminum wrapping over the belly pan still looka a bit unfinished.

To cover the seam, front lower trim is installed.  Banana Wrap!

Tuesday, March 4, 2014

Hatch - Door to the Man Cave


Every man needs a spot of his very own.  A man cave of sorts.  In an Airstream that space may be limited to the area accessed by the hatch.  Actually I am kidding, but Scott does use the exterior compartment more often than I do...

Corrosion required a new rear hatch.


Like the curbside window, the rear hatch also required a new hinge.  Colin Hyde to the rescue!  He made a new hinge.  This is the new lower hinge before it is trimmed to fit the hatch door.


Colin's guys made us all new hatch door with a new Alclad aluminum skin.

Monday, March 3, 2014

Whale Tail Removed - Too Much - Creased, Stretched and Dented


We tried to save the original end cap panels.  Really tried.
The big dent is too big.  Too deep.  Too creased.


Permanently creased, the dented aluminum panels of the street-side end cap are again removed for replacement patterns.

Okay, here's the thing. I am not the handy one in the family. So as well as learning lots - my job is to document the process. So if anyone has any suggestions for how to improve this vintage Airstream blog, please do share with me using the comments feature below. Seriously, I'd like to think that I am not the only one reading this....

Thursday, February 27, 2014

Door-in-a-Door Rebuild - Part 3


Boss!  Da Door!  Da Door!
I don't know why I'm in a mood to think about the old TV show "Fantasy Island", as I never watched it.

Work is done on the Door-in-a-Door!

The inner door rivets were removed to separate the back and frame from the damaged front aluminum.


Prodex insulation is added to each section in the frame.


Using new aluminum, the new outer door is cut and formed.


The two doors are attached together with the hinges.  Then the door hinges are securely attached to the new thick hinge patch also made from aluminum.
LINK to 2/13


Friday, February 21, 2014

Door-in-a-Door Rebuild - Part 2 - New Aluminum Skin

The main door exterior is restored with all new Alclad aluminum.


Interesting to see the frame of the main door.


The main door was insulated.


Inside the main door, the top and bottom aluminum panels were replaced.

Tuesday, February 18, 2014

Lower Panels Replaced - Last Ones!

Our 1955 Flying Cloud has a front panel that wraps around the entire front of the Airstream. Riveted to the bottom of the end cap, the lower front panel does not lining up with the bottom of the jalousie window and extends down to the banana wrap.  The largish panel does extend from the street-side window to the curb-side windows.  After checking RJ Dial's extensive Vintage Airstream website, it appears that the factories had many front panel versions for the 50's Flying Cloud models.

Our new front lower panel is in place and ready for buck rivets.


The small panel just forward of the door was replaced.


Lots of rivets were used to attach the front panel.
Four rows of rivets will attach the shell to the steel attachment-bracket, rather than the two rows Airstream originally used in 1955.


More current models, including our 2008 Airstream no longer are made with any vertical stabilizing steel attachment-bracket commonly called the hold-down plate.  Current production by Airstream has the aluminum shell is riveted to the C-Channel only.

Monday, February 17, 2014

Decision Made - Alclad Aluminum Panel Replaced Street-Side

Decision made.  The lower scraped scratched street-side panel is also to be replaced.

First the rivets are drilled out, the remaining rivet buck-tails are removed and the panel is removed.


A new panel is cut using the old aluminum as a pattern before the new panel is fit into place with cleco fasteners.


It takes two people to attach the panel with bucked rivets.  Outside one guy inserts the rivet head into each drilled hole and uses a rivet gun to forcefully push the rivet tail to a bucking bar held inside by a second person.  The pressure used expands the rivet tail and secures the panels together.


Sunday, February 16, 2014

Rear Street Side Panel Work


It is interesting to watch the progress of the panel replacement.
Rather than remove and replace all the damaged panels at once, Colin Hyde Trailer Restorations is restoring our 1955 Airstream in a methodical and controlled manner.  Each damaged aluminum skin is being removed, duplicated, and new Alclad aluminum is installed - one section of the shell at a time.  Completing one panel at a time controls the shape and insures the original placement is duplicated for the restoration.

I'm glad to have a professional who understands the big picture of what work we requested, what potential additional troubles can be hidden, how systems work together, and scheduling work in a logical method.  Thinking ahead for the integrity, costs, and beauty of our vintage trailer.

The scratched rear corner street side aluminum is removed and replaced and rivet ready.

Saturday, February 15, 2014

Bucking Byam's 1955 Flying Cloud - Rivets!

Bucked rivets are used at the Airstream factory for strength, durability, and structural integrity. Olympic rivets and pop rivets would not be strong enough to withstand the trailer's flex while traveling - listen to TheVap.com Episode 80 for lots more rivet information.

We will be using our vintage Airstream as much as possible, which exactly fits Colin Hyde's commitment to Airstream restoration using the best processes and materials (not every trailer shop has this philosophy). 

Our curb-side lower aluminum is buck riveted.


The shell is buck riveted to the frame through the side of the C-Channel.


Buck rivets securely attach the curbside lower panel.