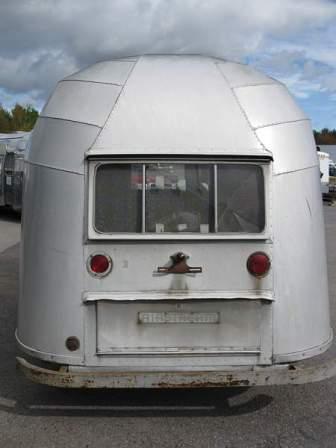
Airstream Restoration of Scott and Kathy's 1955 Flying Cloud Whale Tail - Our California Vintage Airstream.
Showing posts with label Belly Pan. Show all posts
Wednesday, February 5, 2014
Almost Mobile - Axle Mounted
For softer travel and longevity of our vintage Airstream, we changed from the original leaf spring axles to torsion axles.
The center belly pan is prepared and positioned for rivets.
The new torsion axles are mounted.
The axles are bolted onto the mounting plates, and the brakes are wired.
Trailer shocks were installed, attached to the shock mounts in the wheel well. This photo shows the street-side wheel well that was reshaped with an adjusted offset for room for the toilet.
Labels:
Axle,
Belly Pan,
Brakes,
Improvement,
Wheel Well
Location:
Peru, NY 12972, USA
Monday, February 3, 2014
Belly Pan - Panels to Access Plumbing
Colin worked with us to determine the best way to have an Airstream that looks vintage, and still has the modern conveniences that we will use to make our life comfortable.
The curb side and street side belly pan panels are riveted - using the larger belly pan rivets.
Situated in the belly pan, the combination grey water and black water dump valve will be accessible through an access panel on the street side belly panel. The second access panel will allow maintenance on the grey and black water drain pipes, if needed, without cutting open the belly pan.
Using 5052 Aluminum at 032 thick, another street side panel provides maintenance access to the bathroom lavatory sink and shower drains. While we've never had troubles with our 2008 Airstream's plumbing, we have worked on home plumbing a few times. The panels will make any work much easier. Insulated with Reflextix.
The curb side and street side belly pan panels are riveted - using the larger belly pan rivets.
Situated in the belly pan, the combination grey water and black water dump valve will be accessible through an access panel on the street side belly panel. The second access panel will allow maintenance on the grey and black water drain pipes, if needed, without cutting open the belly pan.
Using 5052 Aluminum at 032 thick, another street side panel provides maintenance access to the bathroom lavatory sink and shower drains. While we've never had troubles with our 2008 Airstream's plumbing, we have worked on home plumbing a few times. The panels will make any work much easier. Insulated with Reflextix.
Labels:
Aluminum,
Belly Pan,
Black Water Tank,
Colin Hyde Trailer Restorations,
Drain,
Gray Water Tanks,
Improvement,
Insulation,
Lavatory,
Plumbing,
Rivet,
Shower,
Vintage Airstream
Location:
Peru, NY 12972, USA
Belly Pan - Adding Aluminum Curbside
There was so much work done - today I've made
Colin's guys completed our belly pan installation!!
All the aluminum for the belly pan sides is bent into a curve to closely match the frame's outriggers. Bending the belly pan sides is done with a PVC pipe before the aluminum is installed. I like looking in the background of the photos that Colin sends to see what other projects are in progress at Colin Hyde Trailer Restorations.
The aluminum is positioned over the anti-chaffing strips at the end of the outriggers.
Clecos are use to position the curbside belly pan before riveting.
Labels:
Aluminum,
Belly Pan,
Cleco,
Insulation,
Vintage Airstream
Belly Pan - Streetside
The belly pan installation is proceeding - the 5052 aluminum street side panels are positioned. For more information on the pre-bent aluminum - listen to Episode 202 of the Vintage Airstream Podcast.
So very cool - so I'm posting lots of photos...
Location:
Peru, NY 12972, USA
Sunday, February 2, 2014
Belly Pan - All Curved Corners
A new belly pan is being attached to our vintage Airstream frame!
Our shell-off vintage Airstream restoration at this time looks like 2 completely different projects.
The shell was polished and we need to make a decision about which panel or panels to replace.
And our chassis is getting close to being completely done - so exciting!!
Cuts in the aluminum for the corner construction is very familiar to me. It looks like fabric clipped to ease a concave curve.
Because we added a space for a spare tire under the frame, the belly pan is installed in a few more panels. Just so I don't forget - the belly pan aluminum is not the same as used on the sides of Airstreams. The belly pan is made of 505 032 thick.
The cleco fasteners are holding the rear street-side panel in place before it is riveted. Cleco is a newer tool for me, so I googled the word to find out it is also spelled cleko.
Our shell-off vintage Airstream restoration at this time looks like 2 completely different projects.
The shell was polished and we need to make a decision about which panel or panels to replace.
And our chassis is getting close to being completely done - so exciting!!
Cuts in the aluminum for the corner construction is very familiar to me. It looks like fabric clipped to ease a concave curve.
Because we added a space for a spare tire under the frame, the belly pan is installed in a few more panels. Just so I don't forget - the belly pan aluminum is not the same as used on the sides of Airstreams. The belly pan is made of 505 032 thick.
The cleco fasteners are holding the rear street-side panel in place before it is riveted. Cleco is a newer tool for me, so I googled the word to find out it is also spelled cleko.
Saturday, February 1, 2014
Warming Up - Insulating the Belly Pan
Reflectix reflective insulation is cut to fit under the plywood floor between the frame rails including above the water tanks. It will also be used to insulate under the water tanks.
Note: The step is painted with a UV resistant topcoat over the black POR 15.
The visible portions of the rails will topcoat painted soon.
The portions of the frame that are cut out for the plumbing connections - all will be strong! Each cross member will be strengthened at the bottom with a heavy steel bolt-on bridge. The bolts will allow access to the plumbing if needed at a later date.
The dump valve is installed & valve handles extended through the main rail into an are that will be accessible through a flip down hatch.
Gray tanks installed!
Fiberglass Insulation to really keep us warm!
The end of the cross members have the added anti-chaffing strips.
First piece of the belly pan is cut!!!! We are moving forward again!
Note: The step is painted with a UV resistant topcoat over the black POR 15.
The visible portions of the rails will topcoat painted soon.
The portions of the frame that are cut out for the plumbing connections - all will be strong! Each cross member will be strengthened at the bottom with a heavy steel bolt-on bridge. The bolts will allow access to the plumbing if needed at a later date.
The dump valve is installed & valve handles extended through the main rail into an are that will be accessible through a flip down hatch.
Gray tanks installed!
Fiberglass Insulation to really keep us warm!
First piece of the belly pan is cut!!!! We are moving forward again!
Labels:
1955,
Belly Pan,
Drain,
Dump Valve,
Floor,
Flying Cloud,
Frame,
Fresh Water Tank,
Gray Water Tanks,
Improvement,
Insulation,
Plumbing,
POR15,
Reflectix,
Vintage Airstream
Location:
Peru, NY 12972, USA
Tuesday, January 28, 2014
Working with Barry
Wanted to share this from 8.28.11
Barry invited Scott over to do a little work on his vintage Airstream. I think it was out of sympathy for Scott who is missing our 1955 Flying Cloud... It was a good day!
Labels:
1955,
Barry,
Belly Pan,
Flying Cloud,
Propane
Monday, January 27, 2014
Belly Pan Improvements - Vintage and Better!
As I'm not an expert, I really never thought much about the underside of our trailer. I did know that Airstream trailers have aluminum belly pans which cover the frame, and the bottom of the plywood floors. This keeps all the ugly, wet, muddy, floor-rotting frame-rusting, road debris from ruining the trailers from the foundation up. It is one of many reasons why Airstreams survive and are enjoyed for decades!
One of our improvements are in the area of the spare tire. The tire will fit inside the trailer frame, recessed like the newer model Airstreams. Our vintage Airstream will have this area lined in aluminum, keeping the plywood floor dry. To protect the floor under the frame surrounding the spare tire, the frame is wrapped in more aluminum.
Originally the floor area under our steps appears to have be painted. For our restoration, another belly pan improvement is a new aluminum lining to protect the area above the Swing-Away Step. Colin Hyde fabricated this for us - thank you! This will protect the floor from wood rot found when we first saw our 1955 Flying Cloud.
One of our improvements are in the area of the spare tire. The tire will fit inside the trailer frame, recessed like the newer model Airstreams. Our vintage Airstream will have this area lined in aluminum, keeping the plywood floor dry. To protect the floor under the frame surrounding the spare tire, the frame is wrapped in more aluminum.
Originally the floor area under our steps appears to have be painted. For our restoration, another belly pan improvement is a new aluminum lining to protect the area above the Swing-Away Step. Colin Hyde fabricated this for us - thank you! This will protect the floor from wood rot found when we first saw our 1955 Flying Cloud.
Friday, January 24, 2014
Missed a Post - Sharing Now - More Frame Strength
When I wrote about our now-sturdy steps being installed on our Byam's 55 Flying Cloud - I missed some very important work also done at the same time. Today I found my omission, and wanted to share.
We pull our 2008 Airstream with a Jeep Grand Cherokee including in the mountains of Colorado. We are asked about our experiences and they have all been good with the Jeep's tow package and its V8 Hemi 5.7 liter. Driving without our Airstream, the 4 cylinder "Eco" mode saves us gas too!
Anyway, the Jeep has some room in the back for Byam's kennel, and a lot of other stuff, but not enough room for a spare Airstream tire. Also packing and moving around a gritty spare tire is not my idea of fun. So we decided that we need a spot for the spare tire to always be with the trailer.
Our frame was improved, adding another pair of bracing to provide support for the spare tire under the Airstream. The bracing also adds more strength to the A-Frame.
The additional bracing is painted. Below the frame is upside down and the trailer's front hold-down plate is facing the floor.
Shown with the sheet of aluminum that will be the attached to the frame as part of the belly pan and the aluminum bent to wrap around the frame also.
We pull our 2008 Airstream with a Jeep Grand Cherokee including in the mountains of Colorado. We are asked about our experiences and they have all been good with the Jeep's tow package and its V8 Hemi 5.7 liter. Driving without our Airstream, the 4 cylinder "Eco" mode saves us gas too!
Anyway, the Jeep has some room in the back for Byam's kennel, and a lot of other stuff, but not enough room for a spare Airstream tire. Also packing and moving around a gritty spare tire is not my idea of fun. So we decided that we need a spot for the spare tire to always be with the trailer.
Our frame was improved, adding another pair of bracing to provide support for the spare tire under the Airstream. The bracing also adds more strength to the A-Frame.
The additional bracing is painted. Below the frame is upside down and the trailer's front hold-down plate is facing the floor.
Shown with the sheet of aluminum that will be the attached to the frame as part of the belly pan and the aluminum bent to wrap around the frame also.
Labels:
A-Frame,
Aluminum,
Belly Pan,
Frame,
Hold-Down Plate,
Improvement,
Painting,
Spare Tire,
Vintage Airstream,
Weld
Sunday, April 22, 2012
Subscribe to:
Posts (Atom)
+Central+bellypan+fabrication.jpg)
+Central+Bellypan+Riveted+Axle+Installation.jpg)

+Brake+wiring.jpg)
+Brake+wiring.jpg)
+Shocks+Installed++Streetside+Wheel+Well+Adjusted+Offset+to+Fit+Toilet.jpg)
+Perimeter+belly+pan+panels+riveted.jpg)
+Service+Panel+for+Dump+Valve+and+Access+to+Dump+Valve+Handle.jpg)
+Shower+Service+Panel+for+Shower+and+Lavatory+Sink+Drain+Trap.jpg)

+Pre-bent+bellypan+sides+ready+for+installation.jpg)
+Bellypan+side+installation.jpg)
+Rear+Curb+Side+corner+&+side+with+clecos.jpg)
+Front+Curb+Side+bellypan+sides+ready+for+rivets.jpg)
+Belly+Pan+Curbside+Rivet+Ready.jpg)
+Belly+Pan+Installation+Street+Side.jpg)

+Belly+Pan+Aluminum+Front+Corners.jpg)

+Prefitting+Reflectix+in+frame+-+Step+painted+over+the+POR15.jpg)
+Dump+valve+installed.jpg)
+Grey+tank+final+installation.jpg)
+Fiberglass+insulation+installation.jpg)
+Insulation+installation.jpg)

+compressed.jpg)
+compressed.jpg)
+compressed.jpg)
+compressed.jpg)
+Spare+Tire+Area+on+Frame+compressed.jpg)
+compressed.jpg)
+compressed.jpg)
+compressed.jpg)
+compressed.jpg)
+compressed.jpg)
+compressed.jpg)
+compressed.jpg)


