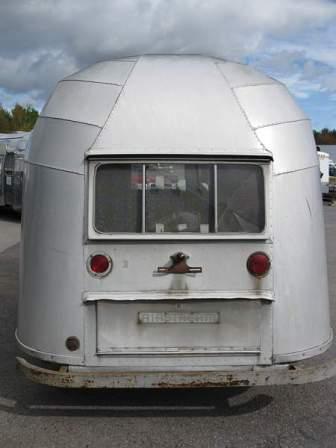
The rear Fantastic Fan is polished and installed. In 1955, each Airstream was built to a customer's specifications. And we are very fortunate to have on our 1955 Flying Cloud Airstream the
"Very Rare Hehr Lid Skylight Panel" and Colin reconfigured it to work
with the Fantastic Fan vent housing using a new gasket. Someday I'd like to find the names of the original owners, and send them a huge thank you for their choices!
Airstream Restoration of Scott and Kathy's 1955 Flying Cloud Whale Tail - Our California Vintage Airstream.
Showing posts with label Shell. Show all posts
Saturday, March 28, 2015
Thursday, May 22, 2014
Heating Up!
While we want hot water and the water heater needs an exterior exhaust and access, I would not want to cut a hole into the shell aluminum. Fortunately this scary job is now done. So excited to be moving forward again!
Monday, March 10, 2014
No Leaks! - Making it Happen.
Now the replacement Alclad panels are attached and the rehabilitated windows are back in their openings, the interior seams area sealed. Vulkem was used as the sealant. To me, the bold lines of the end cap look artistic.
Labels:
Interior,
Shell,
Vulkem and Caulk,
Wall,
Water Damage
Location:
Peru, NY 12972, USA
Saturday, March 8, 2014
Making Our 1955 Flying Cloud Beautiful - More Trim for the Shell
After the Alclad shell is secured to the frame, the aluminum wrapping over the belly pan still looka a bit unfinished.
To cover the seam, front lower trim is installed. Banana Wrap!
Location:
Peru, NY 12972, USA
Monday, March 3, 2014
Whale Tail Removed - Too Much - Creased, Stretched and Dented
We tried to save the original end cap panels. Really tried.
The big dent is too big. Too deep. Too creased.

Permanently creased, the dented aluminum panels of the street-side end cap are again removed for replacement patterns.
Okay, here's the thing. I am not the handy one in the family. So as well as learning lots - my job is to document the process. So if anyone has any suggestions for how to improve this vintage Airstream blog, please do share with me using the comments feature below. Seriously, I'd like to think that I am not the only one reading this....
Location:
Peru, NY 12972, USA
Tuesday, February 18, 2014
Lower Panels Replaced - Last Ones!
Our 1955 Flying Cloud has a front panel that wraps around the entire front of the Airstream. Riveted to the bottom of the end cap, the lower front panel does not lining up with the bottom of the jalousie window and extends down to the banana wrap. The largish panel does extend from the street-side window to the curb-side windows. After checking RJ Dial's extensive Vintage Airstream website, it appears that the factories had many front panel versions for the 50's Flying Cloud models.
Our new front lower panel is in place and ready for buck rivets.
The small panel just forward of the door was replaced.
Lots of rivets were used to attach the front panel.
Four rows of rivets will attach the shell to the steel attachment-bracket, rather than the two rows Airstream originally used in 1955.
More current models, including our 2008 Airstream no longer are made with any vertical stabilizing steel attachment-bracket commonly called the hold-down plate. Current production by Airstream has the aluminum shell is riveted to the C-Channel only.
Our new front lower panel is in place and ready for buck rivets.
The small panel just forward of the door was replaced.
Lots of rivets were used to attach the front panel.
Four rows of rivets will attach the shell to the steel attachment-bracket, rather than the two rows Airstream originally used in 1955.
More current models, including our 2008 Airstream no longer are made with any vertical stabilizing steel attachment-bracket commonly called the hold-down plate. Current production by Airstream has the aluminum shell is riveted to the C-Channel only.
Labels:
Aluminum,
Exterior,
Frame,
Hold-Down Plate,
Improvement,
Rivet,
Shell
Location:
Peru, NY 12972, USA
Sunday, February 16, 2014
Rear Street Side Panel Work
It is interesting to watch the progress of the panel replacement.
Rather than remove and replace all the damaged panels at once, Colin Hyde Trailer Restorations is restoring our 1955 Airstream in a methodical and controlled manner. Each damaged aluminum skin is being removed, duplicated, and new Alclad aluminum is installed - one section of the shell at a time. Completing one panel at a time controls the shape and insures the original placement is duplicated for the restoration.
I'm glad to have a professional who understands the big picture of what work we requested, what potential additional troubles can be hidden, how systems work together, and scheduling work in a logical method. Thinking ahead for the integrity, costs, and beauty of our vintage trailer.
The scratched rear corner street side aluminum is removed and replaced and rivet ready.
Labels:
Aluminum,
Cleco,
Colin Hyde Trailer Restorations,
Exterior,
Shell
Location:
Peru, NY 12972, USA
Saturday, February 15, 2014
Bucking Byam's 1955 Flying Cloud - Rivets!
Bucked rivets are used at the Airstream factory for strength, durability, and structural integrity. Olympic rivets and pop rivets would not be strong enough to withstand the trailer's flex while traveling - listen to TheVap.com Episode 80 for lots more rivet information.
We will be using our vintage Airstream as much as possible, which exactly fits Colin Hyde's commitment to Airstream restoration using the best processes and materials (not every trailer shop has this philosophy).
Our curb-side lower aluminum is buck riveted.
The shell is buck riveted to the frame through the side of the C-Channel.
Buck rivets securely attach the curbside lower panel.
We will be using our vintage Airstream as much as possible, which exactly fits Colin Hyde's commitment to Airstream restoration using the best processes and materials (not every trailer shop has this philosophy).
Our curb-side lower aluminum is buck riveted.
The shell is buck riveted to the frame through the side of the C-Channel.
Buck rivets securely attach the curbside lower panel.
Location:
Peru, NY 12972, USA
Friday, February 14, 2014
As Planned - Alclad Aluminum Panel Replaced Curb-Side
Because a previous owner used exploding rivets, the lower curbside aluminum panel is being replaced.
The original Alclad aluminum skin is removed, and used for a template to cut the new panel.
Clecos are used to check the panel fit.
Also the curbside lower panel is ready for buck rivets.
Location:
Peru, NY 12972, USA
Wednesday, February 12, 2014
Big Dent - Big New Plans
When we bought our Airstream, the beautiful whale tail was dented - two of the end cap panels were dented. Sadly deeply dented. And while not likely, I was truly wanting our dents to be removed, to be another vintage Airstream success story.
Colin Hyde Trailer Restorations has been successful removing dents, with deeper dents improved by 90% or more, so my decision was easy to make to save the panels. The street-side end panels were removed.
Using their very best effort, and finessing the aluminum back into shape, the panels were attached with clecos back to our Airstream whale tale. The panels are were dented, creased, and stretched. The English wheel was not successful in removing the dent and the polished panels would be forever scarred.
So we made another easy decision that new panels will need to be fabricated and installed.
Colin Hyde Trailer Restorations has been successful removing dents, with deeper dents improved by 90% or more, so my decision was easy to make to save the panels. The street-side end panels were removed.
Using their very best effort, and finessing the aluminum back into shape, the panels were attached with clecos back to our Airstream whale tale. The panels are were dented, creased, and stretched. The English wheel was not successful in removing the dent and the polished panels would be forever scarred.
So we made another easy decision that new panels will need to be fabricated and installed.
Location:
Peru, NY 12972, USA
Saturday, February 8, 2014
Can Do! New Tool for Custom Airstream Louvers
Colin Hyde Trailer Restorations now can make restoration louver panels!!
Colin even designed the press base in honor of his shop - the "C" shape!
The new tool will restore vintage airstream water heater access panels, refrigerator panels, or even furnace panels. It will allow a floor-plan layout to be changed to fit more current needs.
Or new panels can be custom designed and manufactured where none before existed.
The panels can be used to cover holes in the shell and tastefully camouflage of aluminum damage.
Testing the tool - super neat!
Colin even designed the press base in honor of his shop - the "C" shape!
The new tool will restore vintage airstream water heater access panels, refrigerator panels, or even furnace panels. It will allow a floor-plan layout to be changed to fit more current needs.
Or new panels can be custom designed and manufactured where none before existed.
The panels can be used to cover holes in the shell and tastefully camouflage of aluminum damage.
Testing the tool - super neat!
Friday, February 7, 2014
Love and Marriage! Putting Shell & Chassis Back Together
Like the old song -
Love and Marriage, Love & Marriage - Goes together like a horse and carriage...
Shell & Chassis, Shell & Chassis - Goes together!!
Love and Marriage, Love & Marriage - Goes together like a horse and carriage...
Shell & Chassis, Shell & Chassis - Goes together!!
Labels:
C-Channel,
Chassis,
Colin Hyde Trailer Restorations,
Shell
Wednesday, January 29, 2014
Position the Plumbing and Narrow the Wheel Well
I need a shower and we also want to keep the living space as open as possible so we need to crowd the bathroom. Before when we checked the fit, there is very little room between the toilet and the wheel wheel.
As new plywood is cut for a floor, the size and shape of the trailer can tweak a little bit. Now our 1955 Flying Cloud final size of the Airstream is defined by the floor attached to the chassis. With the wheel wells attached between the plywood and the frame, the bathroom plumbing needed to be double checked.
Axle and tires on, the chassis is flipped over.
Great news! The shell still fits on the floor/frame!
Next the plumbing parts are laid out in their approximate positions.
The mock-up wall is brought back into our trailer to check the fit.
With the new axle and tire in place, we could check that all would still fit, and as expected the wheel well needed to be slightly adjusted.
As new plywood is cut for a floor, the size and shape of the trailer can tweak a little bit. Now our 1955 Flying Cloud final size of the Airstream is defined by the floor attached to the chassis. With the wheel wells attached between the plywood and the frame, the bathroom plumbing needed to be double checked.
Axle and tires on, the chassis is flipped over.
Great news! The shell still fits on the floor/frame!
Next the plumbing parts are laid out in their approximate positions.
The mock-up wall is brought back into our trailer to check the fit.
With the new axle and tire in place, we could check that all would still fit, and as expected the wheel well needed to be slightly adjusted.
Labels:
Black Water Tank,
Chassis,
Mock-Up,
Plumbing,
Rotisserie,
Shell,
Shower Pan,
Toilet,
Vintage Airstream,
Water Pump,
Wheel Well
Location:
Peru, NY 12972, USA
Tuesday, April 24, 2012
Shell Off - Frame Off - Axle Off!!!
The shell is separated from the frame!
Although our vintage airstream is still being deconstructed, this seems like such huge progress!!
Above is the top of the floor with the parquet wood flooring that covered all the floor rot. Below the photo is of the bottom of the subfloor - with all the rotted edges.
The old axle with leaf springs is coming off - to be replaced with a torsion axle for a smoother kinder ride for our 1955 Airstream Flying Cloud.
The great news is that the tire fits into the "A" portion of the frame. The new fresh water tanks will not fit into the angled main frame rails. The change will give us the 2 tanks at 17 gallons each - for a total of 34 gallons of fresh water up front and capacity for 34 gallons of gray water. These are the new Vintage Trailer Supply tanks - item # VTS-851.
Labels:
Floor,
Frame,
Plumbing,
Rotisserie,
Shell,
Vintage Airstream,
Vintage Trailer Supply,
Water Damage
Location:
Peru, NY 12972, USA
Subscribe to:
Posts (Atom)
.jpg)
.jpg)
%2BCutting%2Bhole%2Bfor%2Bhot%2Bwater%2Bheater.jpg)
+Interior+Seam+Sealed.jpg)
+Seam+Sealing+with+Vulkem.jpg)
+End+Cap+Seam+Sealed.jpg)
+More+Seam+Sealing.jpg)
+Front+Lower+Trim+Installation.jpg)
+Front+Banana+Wrap+Lower+Trim+Installed.jpg)

+Front+Wrap+Panel+Ready+to+Rivet.jpg)
+Curbside+Panel+in+Front+of+the+Door.jpg)
+Bucking+Front+Wraparound+Panel.jpg)
+on+2008+Airstream.jpg)
+Removing+Streetside+Lower+Rear+Corner+Skin.jpg)

+Curbside+Panel+Rivet+Bucking+in+Progress.jpg)
+Bucking+Curbside+Panel+to+C-Channel.jpg)
+Bucking+Rear+Curbside+Corner+Aluminum.jpg)
+Panel+bucked+curbside+rear+in+place.jpg)
+Curbside+Panel+Rmoved.jpg)
+Old+Aluminum+for+New+Panel+Pattern.jpg)
+Cutting+New+Alclad+Aluminum+for+Curbside+Shell.jpg)
+Checking+Fit+of+Curbside+Panel.jpg)
+Rear+Curbside+Corner+Panel+Skin+Ready+to+Rivet.jpg)


+Testing+Louver+Press+-+1st+Test.jpg)
+Testing+Louver+Press+-+1st+Test+Press+-+1st+Test.jpg)
+Testing+Louver+Press+-+1st+Test.jpg)
+Lowering+Shell+onto+Chassis.jpg)
+compressed.jpg)
+compressed.jpg)
+compressed.jpg)
+compressed.jpg)
+compressed.jpg)

+compressed.jpg)
+compressed.jpg)
+compressed.jpg)
+compressed.jpg)
+compressed.jpg)
+compressed.jpg)
+compressed.jpg)
+compressed.jpg)
+compressed.jpg)
+compressed.jpg)