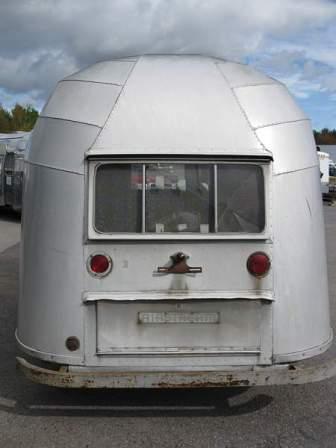
Airstream Restoration of Scott and Kathy's 1955 Flying Cloud Whale Tail - Our California Vintage Airstream.

Tuesday, January 28, 2014

Floor Attached to Frame!

Construction!
No longer pulling things apart!
All the preparation work is complete, things are going back together again, and I could not be any happier!!

The old leaf spring axle is gone, white the new smoother riding torsion axle is positioned and the bracket is attached to the frame.


Glue is used to attach the plywood floor is to the frame.


Elevator bolts are used by the Airstream factory to attach the C-Channel to the outriggers only - so they are spaced widely apart, approximately every 2 feet.  Then the factory used (uses) self taping screws are used to attach the C-Channel to the plywood between the outriggers.  
Our 1955 Flying Cloud has Colin's added strength by using elevator bolts inside the C-channel - all along the C-Channel to more securely attach the frame to the floor and therefore lessen stress to the trailer.  The elevator bolts are attached to the outriggers and to the plywood floor.  Colin used self-taping screws to further secure the plywood floor to the outriggers and the cross members.
Improved again!  Even the curves are attached with elevator bolts - every 8" to 10".


Using the rotisserie, our Airstream is moved to comfortable positions for securely bolting the floor and chassis together. Shown with the hold-down plate welded to the front of the frame.  The extra elevator bolts are best seen in the photo from the under-side of the plywood floor.


Working with Barry

Wanted to share this from 8.28.11
Barry invited Scott over to do a little work on his vintage Airstream.  I think it was out of sympathy for Scott who is missing our 1955 Flying Cloud...  It was a good day!


Monday, January 27, 2014

Belly Pan Improvements - Vintage and Better!

As I'm not an expert, I really never thought much about the underside of our trailer.  I did know that Airstream trailers have aluminum belly pans which cover the frame, and the bottom of the plywood floors.  This keeps all the ugly, wet, muddy, floor-rotting frame-rusting, road debris from ruining the trailers from the foundation up. It is one of many reasons why Airstreams survive and are enjoyed for decades!

One of our improvements are in the area of the spare tire.  The tire will fit inside the trailer frame, recessed like the newer model Airstreams.  Our vintage Airstream will have this area lined in aluminum, keeping the plywood floor dry.  To protect the floor under the frame surrounding the spare tire, the frame is wrapped in more aluminum.


Originally the floor area under our steps appears to have be painted.  For our restoration, another belly pan improvement is a new aluminum lining to protect the area above the Swing-Away Step.  Colin Hyde fabricated this for us - thank you!  This will protect the floor from wood rot found when we first saw our 1955 Flying Cloud.

Sunday, January 26, 2014

Location, Position, Check, and Double Check

I'm so excited!  We are getting closer to putting the aluminum shell back onto the frame!

Wheel well is located close to the shower pan.  Both locations are finalized and the shower pan is checked to fit and be supported by the cross members. 


To keep water from damaging our new floor, the plywood is sealed or waterproofed.  Colin uses Smiths CPES Penetrating Epoxy 2 part epoxy.  The underside is soaked and the upper side is sealed at the outer edges of each board.


The C-Channel will hold the wall and provides the stability and contact between the wall and the wood floor and chassis below. 


The curved C-Channel for the front and rear corners was made in 1955 by Airstream in small segments. Colin fabricated new C-Channels from 032 aka 50/50 aluminum "belly pan" aluminum.
Then the C-Channel is positioned on the floor, checking the fit again.

Saturday, January 25, 2014

Strapping Tanks

Below the floor, will be two gray water tanks, and also 2 fresh water tanks.  These are standard 16 gallon tanks, now available at Vintage Trailer Supply - saves lots of money!  The metal straps, fabricated by Colin Hyde,  will keep the tanks secured in between the main rails.


UPDATE 2/6/2014 -  Colin Hyde's reply to Gary's question.

I have a 55 Flying Cloud also. I'm in the process of installing the water tanks now. Why do the straps have a loop in them? They don't have a "loop" in them. They are formed like a "C" with short legs on either end. This allows us to install the bolts longitudinally instead of vertically, causing protrusions in the bellypan. It also allows us to put tension on the straps.  How are they secured on the topside (is it just pressure against the bottom of the floor)? The tanks are up against the underside of the floor & foam blocks minimize lateral movement. 
Coli

Friday, January 24, 2014

Missed a Post - Sharing Now - More Frame Strength

When I wrote about our now-sturdy steps being installed on our Byam's 55 Flying Cloud - I missed some very important work also done at the same time.  Today I found my omission, and wanted to share.

We pull our 2008 Airstream with a Jeep Grand Cherokee including in the mountains of Colorado.  We are asked about our experiences and they have all been good with the Jeep's tow package and its V8 Hemi 5.7 liter.  Driving without our Airstream, the 4 cylinder "Eco" mode saves us gas too!

Anyway, the Jeep has some room in the back for Byam's kennel, and a lot of other stuff, but not enough room for a spare Airstream tire.  Also packing and moving around a gritty spare tire is not my idea of fun.  So we decided that we need a spot for the spare tire to always be with the trailer.   

Our frame was improved, adding another pair of bracing to provide support for the spare tire under the Airstream.  The bracing also adds more strength to the A-Frame.


The additional bracing is painted.  Below the frame is upside down and the trailer's front hold-down plate is facing the floor.


Shown with the sheet of aluminum that will be the attached to the frame as part of the belly pan and the aluminum bent to wrap around the frame also.

Panel or Not to Panel - That is the Question

Vintage Aluminum and Vintage Airstream have such an appeal!

When visiting our trailer at Colin's shop - we looked over the entire skin of our 1955 Flying Cloud.  We were better able to see what the photos showed about the one panel that was obviously damaged.  The curb-side panel behind the door was "buggered up" from exploding rivets.  To best love our trailer, especially when we sat outside with friends, that at least one panel would need to be replaced.  And so the decision was made early into the restoration.

Polishing was started.


Now with the first cut of polishing complete on the lower body aluminum, we have another decision.  From repairs and improvements on our stationary home, we've learned about the while-we-are-working-here-anyway syndrome.


The street-side lower oxidized aluminum looked good, but the polishing has revealed deep scratches into the panel.  The rub marks looks like a bush or tree repeatably and violently scarred through the Alclad.