Airstream Restoration of Scott and Kathy's 1955 Flying Cloud Whale Tail - Our California Vintage Airstream.
Showing posts with label Colin Hyde Trailer Restorations. Show all posts

Sunday, March 29, 2015

Colin's New Hobby - Beading

Colin added new equipment to his shop and just in time!  1955 Airstreams, actually "all" of the Airstreams until approximately 1959 were made with 13 panel end caps.  These thirteen end cap panels each has a rolled edge at the bottom of the aluminum which is made with a set of bead rollers.

Our 2008 CCD Airstream does not have this feature.  Don't run your fingers over these sharper seams!

Saturday, March 28, 2015

Hehr Ventalation - Vintage Delight!

The rear Fantastic Fan is polished and installed.  In 1955, each Airstream was built to a customer's specifications.  And we are very fortunate to have on our 1955 Flying Cloud Airstream the "Very Rare Hehr Lid Skylight Panel" and Colin reconfigured it to work with the Fantastic Fan vent housing using a new gasket.  Someday I'd like to find the names of the original owners, and send them a huge thank you for their choices!

Thursday, March 26, 2015

Colin has been busy working on our Airstream!!!
Now I will get busy updating this blog - there are lots of photos to study and share. 
Stay tuned!
May 2014 posts are being dated to time when work was done.

Wednesday, May 21, 2014

Back to Work

Colin has been busy working on our Airstream!!!
Now I will get busy updating this blog - there are lots of photos to study and share. 
Stay tuned!
May 2014 posts are being dated to time when work was done.

Friday, March 21, 2014

Work is on Vacation - Awaiting More to Post

Colin is working on other customers' trailers.
We agreed when he started this project, that we would share his time with other customers - we do want him to stay in business!


I will share more when we have more to post - stay tuned!
Kathy

Sunday, March 16, 2014

Protecting Jalousie Window

Our only jalousie window is at the front of the 1955 Flying Cloud.  Many other trailers have jalousie windows on the sides of their vintage trailers, but the original owners (who are you?) chose to have the window with glass louvers at the dining area.

Great idea but, what about the potential for crashing flying rocks?  Even tiny chips of gravel or sand flying at 60 mph could break glass.  We enjoy fly fishing, and many of the best "hidden" spots are along winding rivers on narrow gravel roads.  To drive to quiet spots and/or boondock, we again will need the smaller less maintained roads which are not paved in concrete and cement or asphalt.  So Colin's guys made us a custom built stone guard for our front window.  Made of wavy green fiberglass, and yes Colin did say fiberglass!  We will have light and save our windows too!


Shown propped open while our stone guard awaits the opening arms and tie down clips.


Looking at the details!


Saturday, March 15, 2014

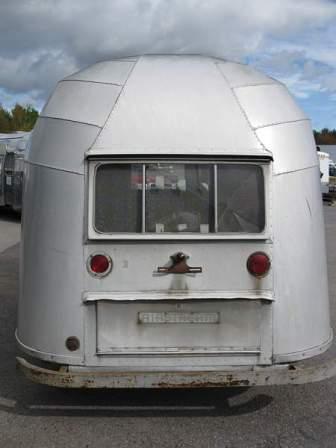
First Look - New Bumper Trunk Lid - Keeping Water Out!!!

Just a quick sneak peak at our new bumper trunk.  This is not original to our trailer, so Colin's guys fabricated the aluminum lid.
Key to keeping the plywood floor from rotting is to keep it dry.  Our 1955 Flying Cloud has the sloping rear end which helps move water away from the trailer.  Colin added the aluminum flashing between the exterior shell and the C-Channel.  This small but huge addition acts like flashing in other applications, moving rain water away from the entry point.
We will definitely use the extra outdoor storage, and I really appreciate the extra protection at the rear of the trailer.

Thursday, March 13, 2014

Improvement to Original Shell Structure - Wheel Well Support

Airstreams are built to last.  Part of the durability is how the shell is attached with rivets to C-Channels which are bolted to the floor and frame.

Back in 1955, two areas where the interior aluminum walls were not secured to the wall structure are the wheel wells.  Colin was careful to improve our trailer during restoration.  C-Channels were added to the wheel well - to secure this area of potential weakness.


Sorry for the fuzziness of this second photo.

Tuesday, March 11, 2014

Windows - We've Got Windows! - Part 5 - Support

Support - another Colin Improvement for our 1955 Flying Cloud.

The vintage Airstream windows were not all well supported in the walls.  Colin adds aluminum to stabilize the windows for travel down the road.


Supports were also fabricated for the windows themselves.


I continue to be impressed with how Colin plans ahead to create a quality restoration - Thanks Colin!

I'm testing a new photo posting method - click on the photo for a slightly larger photo.  Do you like it?


Sunday, February 16, 2014

Rear Street Side Panel Work


It is interesting to watch the progress of the panel replacement.
Rather than remove and replace all the damaged panels at once, Colin Hyde Trailer Restorations is restoring our 1955 Airstream in a methodical and controlled manner.  Each damaged aluminum skin is being removed, duplicated, and new Alclad aluminum is installed - one section of the shell at a time.  Completing one panel at a time controls the shape and insures the original placement is duplicated for the restoration.

I'm glad to have a professional who understands the big picture of what work we requested, what potential additional troubles can be hidden, how systems work together, and scheduling work in a logical method.  Thinking ahead for the integrity, costs, and beauty of our vintage trailer.

The scratched rear corner street side aluminum is removed and replaced and rivet ready.
Saturday, February 8, 2014

Can Do! New Tool for Custom Airstream Louvers

Colin Hyde Trailer Restorations now can make restoration louver panels!!


Colin even designed the press base in honor of his shop -  the "C" shape!


The new tool will restore vintage airstream water heater access panels, refrigerator panels, or even furnace panels.  It will allow a floor-plan layout to be changed to fit more current needs.
Or new panels can be custom designed and manufactured where none before existed.
The panels can be used to cover holes in the shell and tastefully camouflage of aluminum damage.

Testing the tool - super neat!

Friday, February 7, 2014

Love and Marriage! Putting Shell & Chassis Back Together

Like the old song - 
Love and Marriage, Love & Marriage - Goes together like a horse and carriage...
Shell & Chassis, Shell & Chassis - Goes together!!

Past Post Upgrade - Strapping Tanks


Colin Hyde provided more information which I've used to update the 1/25/2014 post Strapping Tanks.

Monday, February 3, 2014

Belly Pan - Panels to Access Plumbing

Colin worked with us to determine the best way to have an Airstream that looks vintage, and still has the modern conveniences that we will use to make our life comfortable.

The curb side and street side belly pan panels are riveted - using the larger belly pan rivets.


Situated in the belly pan, the combination grey water and black water dump valve will be accessible through an access panel on the street side belly panel.  The second access panel will allow maintenance on the grey and black water drain pipes, if needed, without cutting open the belly pan.


Using 5052 Aluminum at 032 thick, another street side panel provides maintenance access to the bathroom lavatory sink and shower drains.  While we've never had troubles with our 2008 Airstream's plumbing, we have worked on home plumbing a few times.  The panels will make any work much easier.  Insulated with Reflextix.


Belly Pan - Streetside

The belly pan installation is proceeding - the 5052 aluminum street side panels are positioned.  For more information on the pre-bent aluminum - listen to Episode 202 of the Vintage Airstream Podcast.
So very cool - so I'm posting lots of photos...

Friday, January 31, 2014

Adding Grey Tanks - First in 58 Years! Part 2

At Colin Hyde Trailer Restorations, Reid has been working on our plumbing - thanks Reid!

The bathroom lavatory sink and shower join to drain down to the first (forward) tandem grey tan.
 First checking the fit of all parts before they are attached/glued together permanently


Adding gray tanks to our vintage Airstream for the first time in 58 years! 
During travel, trailers move and flex.  While it is not legal or safe to ride in a moving trailer, someday I'd like to get a video set up to see the movement that happens.  The movement can break areas that are too stiff.  To be sure that our tandem tanks maintain a secure and dry connection, a flexible link is added between grey the two tanks.  Thick rigid foam insulation is added to further protect the link and will keep the tanks from shifting forward and backward within the frame.  A similar link will be added to the tandem fresh water tanks.


From the back of the rear grey tank, the used water will exit the trailer through the combination black and gray water valve.  Unlike modern trailers, the dump valve will not hang below the belly pan.  I just realized I have very few photos showing our dump valve - just not photogenic!   Because in 1955 we had no dump valve, our Flying Cloud valve handle will not show on the exterior of the trailer. The valve handle will be accessible through a hatch in the belly pan.  This decision will also keep our restoration with the beautiful clean design of 1955.


Both the fresh & grey water tanks with plumbing connections.
  
The portions of the frame that are cut out for the plumbing connections - all will be strong!  Each cross member will be strengthened at the bottom with a heavy steel bolt-on bridge.  The bolts will allow access to the plumbing if needed at a later date.


The shower pan's drain trap will fit inside the frame, hidden by the belly pan.


Tuesday, January 28, 2014

Floor Attached to Frame!

Construction!
No longer pulling things apart!
All the preparation work is complete, things are going back together again, and I could not be any happier!!

The old leaf spring axle is gone, white the new smoother riding torsion axle is positioned and the bracket is attached to the frame.


Glue is used to attach the plywood floor is to the frame.


Elevator bolts are used by the Airstream factory to attach the C-Channel to the outriggers only - so they are spaced widely apart, approximately every 2 feet.  Then the factory used (uses) self taping screws are used to attach the C-Channel to the plywood between the outriggers.  
Our 1955 Flying Cloud has Colin's added strength by using elevator bolts inside the C-channel - all along the C-Channel to more securely attach the frame to the floor and therefore lessen stress to the trailer.  The elevator bolts are attached to the outriggers and to the plywood floor.  Colin used self-taping screws to further secure the plywood floor to the outriggers and the cross members.
Improved again!  Even the curves are attached with elevator bolts - every 8" to 10".


Using the rotisserie, our Airstream is moved to comfortable positions for securely bolting the floor and chassis together. Shown with the hold-down plate welded to the front of the frame.  The extra elevator bolts are best seen in the photo from the under-side of the plywood floor.