Airstream Restoration of Scott and Kathy's 1955 Flying Cloud Whale Tail - Our California Vintage Airstream.

Friday, February 28, 2014

Windows - We've Got Windows! - Part 2 - Rear and Front

Our plans for how we use our vintage Airstream are to enjoy our time - as we currently do with our 2008 CCD.


We rarely use full hook-ups.  We do enjoy traveling and camping in the hot summer months, so we do look for sites with electricity to get some sleep.  We boondock and enjoy staying at remote locations without electricity where ventilation is key to our comfort.  Like the cutest shoe, if uncomfortable - then it won't get used.

All all these are considerations when buying an Airstream, and I'd highly recommend renting a trailer before buying one, as it helped me to understand the comforts I needed, wanted, and what options are merely a waste of time/space/money.

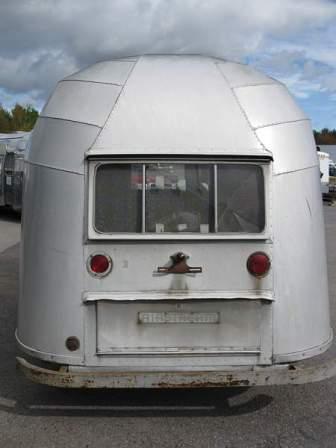
At the rear of the trailer, the large window provides an emergency exit.  When towing, the rear window also provides a clear line of sight to the road behind the trailer. Currently, this feature is no longer available from Airstream, and is another reason we wanted a vintage trailer.

Set inside the trailer the "back-window" of the jalousie window is cleaned up and has a new screen.


The "back-window" of the rear window is cleaned up with new gasket and new screen. The mullions will be attached after they are powder coated.


The aluminum mullions and frames are polished and new glass is inserted into the rebuilt frame with new gaskets.


Cleco fasteners are inserted hold the front jalousie window (old glass was removed).


The window edges were taped to be ready for Vulkem caulk and buck rivets.


The jalousie window is riveted to the Airstream shell.

Thursday, February 27, 2014

Door-in-a-Door Rebuild - Part 3


Boss!  Da Door!  Da Door!
I don't know why I'm in a mood to think about the old TV show "Fantasy Island", as I never watched it.

Work is done on the Door-in-a-Door!

The inner door rivets were removed to separate the back and frame from the damaged front aluminum.


Prodex insulation is added to each section in the frame.


Using new aluminum, the new outer door is cut and formed.


The two doors are attached together with the hinges.  Then the door hinges are securely attached to the new thick hinge patch also made from aluminum.
LINK to 2/13


Wednesday, February 26, 2014

Marmoleum Sees the Light of Day

Planning.  Changes to plans.  
So goes any project, and this vintage trailer is no exception.
In January, we found out that we chose a now discontinued color.   Marmoleum Mineral 5714 is discontinued - we needed to start again.

Limiting my choices to sheet Marmoleum, not tiles, I ordered samples in gray and cream shades in the patterns Piano, Concrete, Fresco, Real, Graphic, and Straito.

New Marmoleum samples arrived last week
I'd hoped for something that I liked almost as well, but instead there were 3 choices that I liked!
Marmoleum Real - Color Eiger is a possibility.
Marmoleum Real - Color Slate Gray is really interesting.
Marmoleum Fresco - Color Eternity very nice. 

We made these our initial preferences - comparing each Marmoleum swatch with our other fabric, curtain, Zolatone, and wood swatches.  I used a cookie baking sheet, moving them from room to room to see how different light affected the colors.  I was checking them again and again.  And again.  Finally the weekend arrived so we could check the colors all together in strong daylight - to see if our indoor-lighting flooring preferences would hold up in "real" light.

While I've never had a new house built, we've worked quite a bit sprucing up and updating our home.  Restoration of our 1955 Flying Cloud restoration is much like a stationary house.  First the structure, then the details.  I'm so excited to be in the "details" stage!

Marmoleum Real - Color Eiger is our choice.

Tuesday, February 25, 2014

Air Conditioner - Plan - Floor Plan

Looking at the Air Conditioner again - so I wanted to share Scott's detailed floor plan.

Monday, February 24, 2014

Raised Eybrow! - Drip Edge for the Door

Back in the 1955 Airstream trailers had people-like personalities.  The straightend and polished door's eyebrow gutter was installed.

Sunday, February 23, 2014

Windows - We've Got Windows! - Part 1 - Awning Windows


Yipee!!!   The windows are going back into our Flying Cloud!!


1955 vintage Airstream windows were manufactured more than one window type. Many Airstream trailers of the era were manufactured with custom features.  Some features were only offered from either the Ohio or the California factory.  Owners would place an order for a trailer options, and the factory would build a trailer for that owner.  A couple places to see the 1955 Flying Cloud options is vintageairstream.com or to read the 1955 Flying Cloud threads on airforums.com.

Our Airstream's largest windows are fixed windows letting lots of light for the front dinette with only lower awning windows open.  The front window is a jalousie window which has louvers that can be opened for ventilation during a cooling rain.  Smaller windows on the sides of the trailer open fully as does the rear window.

On the fully-opening street-side and the curb-side awning windows, there are two main assemblies.  The exterior-window with glass that moves to allow air into the trailer, and also the "back-window" that is stationary.  Reid installed new glass and gaskets in exterior-window - installed on the back side of the polished frames.


The fixed portion of the awning windows, the "back-windows" are fit into the aluminum shell using cleco fasteners.


The tape was put down in preparation for caulking with vulkem and then buck riveting.


Saturday, February 22, 2014

Vent-A-Lation


After removing our original vents, Colin called to check on where we wanted our vent and fan placements.  We are keeping the same vent hole locations on the roof, yet one of our vent covers is very special.  We've decided to place the solid vent covers at the front and back of our 1955 Flying Cloud.  And we are terribly lucky to have a Hehr.


The exterior of the skylight vent cover is polished and ready to install near the center adding light to our kitchen while we are boondocking.

Friday, February 21, 2014

Door-in-a-Door Rebuild - Part 2 - New Aluminum Skin

The main door exterior is restored with all new Alclad aluminum.


Interesting to see the frame of the main door.


The main door was insulated.


Inside the main door, the top and bottom aluminum panels were replaced.

Thursday, February 20, 2014

Door-in-a-Door Rebuild - Part 1


Airstream's door in a door is such a cool feature of our 1955 Flying Cloud.  When we first started looking to buy a travel trailer, we were quick to choose an Airstream.  The streamlined beauty of all Airstream trailers and the silver motorhomes is classic, iconic, and appealing.  Made in the mid-west (Jackson Center Ohio) the durability and long life of Airstream made our decision an easy one!

When researching vintage Airstream trailers, one feature that I wished to have was the door in a door.  Got it!!!
Like many things that 59 year old, our door needed a bit of work.

The inner door within the door was removed.


The rivets were drilled out and the outer skin was removed from our main door.


The original deadbolts that hold the smaller door will be sandblasted and painted.

Wednesday, February 19, 2014

Air Conditioner - Plan - PhotoShop Version

Scott's Air Conditioner Plan - Photoshop Photo of Location


Air Conditioner - Plan - Cross Section

Midwest summers are hot and humid and I've outgrown my childhood days of a house with no air conditioning.  At 90+ degrees and with dripping tropical humidity, I now need air conditioning to sleep.  So our restored vintage Airstream will have air conditioning.

At the rear of the trailer and under the floor, our air conditioner condenser will be out of sight!
Here is a cross section that Scott drew - looking at the rear of the trailer.

Tuesday, February 18, 2014

Lower Panels Replaced - Last Ones!

Our 1955 Flying Cloud has a front panel that wraps around the entire front of the Airstream. Riveted to the bottom of the end cap, the lower front panel does not lining up with the bottom of the jalousie window and extends down to the banana wrap.  The largish panel does extend from the street-side window to the curb-side windows.  After checking RJ Dial's extensive Vintage Airstream website, it appears that the factories had many front panel versions for the 50's Flying Cloud models.

Our new front lower panel is in place and ready for buck rivets.


The small panel just forward of the door was replaced.


Lots of rivets were used to attach the front panel.
Four rows of rivets will attach the shell to the steel attachment-bracket, rather than the two rows Airstream originally used in 1955.


More current models, including our 2008 Airstream no longer are made with any vertical stabilizing steel attachment-bracket commonly called the hold-down plate.  Current production by Airstream has the aluminum shell is riveted to the C-Channel only.

Monday, February 17, 2014

Decision Made - Alclad Aluminum Panel Replaced Street-Side

Decision made.  The lower scraped scratched street-side panel is also to be replaced.

First the rivets are drilled out, the remaining rivet buck-tails are removed and the panel is removed.


A new panel is cut using the old aluminum as a pattern before the new panel is fit into place with cleco fasteners.


It takes two people to attach the panel with bucked rivets.  Outside one guy inserts the rivet head into each drilled hole and uses a rivet gun to forcefully push the rivet tail to a bucking bar held inside by a second person.  The pressure used expands the rivet tail and secures the panels together.